http://home.earthlink.net/~mikesherman/images/2a3front.jpg
http://home.earthlink.net/~mikesherman/images/2a3top.jpg
http://home.earthlink.net/~mikesherman/images/2a3inside.jpg
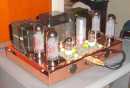
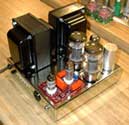
I finally finished my 2A3 PP project. (see above photos)
The PT is a 240-0-240 toroid from Antek I had sitting around.
The OTs are Amplimo 3A524s lifted from an amp that didn't deserve them.
I made my own tranny covers and potted the toroids myself which turned out to be more work than I had anticipated.
The power tubes are Sovtek 2A3s. The rectifier tubes are two 6AX4GT TV dampers. The driver tubes are 7F7s and 7N7s which are the loktal equivalents of 6SL7s and 6SN7s.
The driver circuit is a 7F7 in SRPP followed by a 7N7 LTP with an LM234 CC sink tail. The driver power supply is separate from the power tube supply. The driver power supply comes from an 18 vac-240vac by the power toroid's 6v+12v filament in series. Another small 12vac-120vac tranny in reverse supplies the bias for the fixed bias circuit.
The main power supply is LCLC. Each 2A3 has its own filament tranny.
The bias adjustments are 10K 20 turn trimpots snapped into panel mount housings and are accessed easily from the top with a small screwdriver.
Output is 8 watts per channel from 20hz to 20Khz and beyond.
Square wave inputs show no ringing so there is no feedback used.
One issue that I need to fix has to do with the potted PT mounted on a steel chassis. I have the same issue with a SE amp that has a Trafomatic potted toroid PT. Since the toroid does not mount flush on the steel chassis but has a slight air gap, the 60hz magnetic field vibrates the steel chassis under the PT just like a speaker. I think the addition of some foam rubber in that gap would solve the problem but I wish I had know that BEFORE I finished all the wiring. When I bench tested it, it was always upside down on a soft towel so I didn't notice the hum until I hooked it up in my system.... Yellow_Light_Colorz_PDT_14
2A3 PP amp
8 posts
• Page 1 of 1
2A3 PP amp
![]() by mesherm » Sat Jan 10, 2009 2:32 pm
by mesherm » Sat Jan 10, 2009 2:32 pm
Mike's N-1 Rule: When looking for N number of components to finish a job, you have a 95% chance of only finding N-1 of them.
-
mesherm - KT88
- Posts: 1232
- Joined: Fri Aug 27, 2004 10:33 pm
- Location: Alvin Texas
![]() by Quad » Sun Jan 11, 2009 5:19 am
by Quad » Sun Jan 11, 2009 5:19 am
Great work, Mike. Do post the schematic when you get a chance.
I faced the same problem with the potted toroids with the amp I made
using potted Trafomatic toroids. I packed the space under
the toroids with round pieces cut out of an old cardboard PC
monitor packing box.
I didn't use rubber because I was not sure how hot transformers would
get and didn't want foam rubber becoming all sticky later.
Perhaps an inner tube rubber would work.
The cardboard spacers/dampers are visible if you look carefully here -
http://picasaweb.google.com/prasadb/Tub ... 2287484194
http://picasaweb.google.com/prasadb/Tub ... 9065546306
http://picasaweb.google.com/prasadb/Tub ... 7663581650
- Prasad
- Quad
- KT88
- Posts: 254
- Joined: Mon Jan 14, 2008 6:54 am
- Location: India
![]() by EWBrown » Sun Jan 11, 2009 9:46 am
by EWBrown » Sun Jan 11, 2009 9:46 am
Nice amp, looks great! must weigh quite a bit, with eleven pieces of iron...
Most of the unpotted Antek and Trafomatic toriods I've bought came supplied with one or two rubber washer / gaskets to protect the windings from the metal chassis and mounting disk. These were hard black rubber, similar to that used in inner tubes, perhaps a bit thicker
also helps to reduce or eliminate the 50Hz or 60Hz machanical hum caused by the tranny core's vibration.
You don't have to remove and disconnect the trannie, just cut a slit from rim to center of the gasket, loosen up the trannie mounting bolt and work the rubber in between the tranny and chassis.
So far I have only tested the potted toriods as you described, sitting upside down on a towel or rubber pad.
Another thing I found helpful with any toriod power trannie, is to place a thick nylon washer under the mounting bolt head. THis does two things, it spreads out the bolt tension over a larger area of the chassis, and reduces the mechanical vibration. These nylon washers can be found at any hardware store. I also use a metal washer between the bolt head and nylon washer, to protect the nylon part.
/ed B
Real Radios Glow in the Dark
-

EWBrown - Insulator & Iron Magnate
- Posts: 6389
- Joined: Wed Mar 19, 2003 6:03 am
- Location: Now located in Clay County, NC !
![]() by Brik » Sun Jan 11, 2009 10:29 am
by Brik » Sun Jan 11, 2009 10:29 am
This is a beautiful amplifier with outstanding craftsmanship!
I have always dreamed of constructing a 2A3 push-pull, but the difficulties of design and the cost of the valves and all the iron made it a "some time in the future" project. Yellow_Light_Colorz_PDT_12
Congratulations on the fine work. :drool: (I am drooling).
/b
I have always dreamed of constructing a 2A3 push-pull, but the difficulties of design and the cost of the valves and all the iron made it a "some time in the future" project. Yellow_Light_Colorz_PDT_12
Congratulations on the fine work. :drool: (I am drooling).
/b
-

Brik - Posts: 204
- Joined: Fri Apr 07, 2006 5:30 pm
- Location: West of Boston
Re: 2A3 PP amp
![]() by Blair » Sun Jan 11, 2009 11:21 am
by Blair » Sun Jan 11, 2009 11:21 am
mesherm wrote:The PT is a 240-0-240 toroid from Antek I had sitting around.
The OTs are Amplimo 3A524s lifted from an amp that didn't deserve them.
I made my own tranny covers and potted the toroids myself which turned out to be more work than I had anticipated.
Hey Mike,
That amp looks great!
I know you said you made the tranny covers yourself, but what did you use and/or where did you get the materials?
Blair
- Blair
- KT88
- Posts: 1272
- Joined: Thu Nov 09, 2006 10:22 am
![]() by mesherm » Sun Jan 11, 2009 12:24 pm
by mesherm » Sun Jan 11, 2009 12:24 pm
http://home.earthlink.net/~mikesherman/images/Toriod%20covers.JPG
http://home.earthlink.net/~mikesherman/images/toroid%20covers%202.JPG
http://home.earthlink.net/~mikesherman/images/toroid%20covers%203.JPG
I bought the metal from an online place called speedymetals.com. I tried to pick out the thinest tube stock that would fit the OD of the toroid. I then asked for a 1/8 inch thick slice of round aluminum bar to inside the tube.
The edges were sawblade rough when received so I used the metal lathe at work to cleanup the tube edges. I then used the lathe to recess (if necessary) one end of the tube on the inside to fit the bar slices. Once they fit I laid them on a flat surface covered over with Saran wrap and poured in some epoxy resin to seal that end. Once the epoxy was hard it was back to the lathe to turn down the top until it was even. The gap between the tube and the disk is bearly visible close up.
Next came the potting. I used a clear casting epoxy called Environmental Tech EasyCast from MisterArt.com. It came in two 16 oz bottles.
I used paper cups (not waxed) and mixed the epoxy as directed. For the PTs I had previously filled in the center part with epoxy putty and the carefully drilled a hole in the center for an 8-32 screw. Then I cut out some round disks of paper toweling to fit inside the bottom of the cover for the toroid to rest on and so the bolt would not contact the cover.
The PT was edge mounted using 3 threaded hole I had drilled in. The wall thickness was 1/4 inch. (smallest wall available in that diameter)
Then I poured in the mixed epoxy and let it sit overnight.
Mike's N-1 Rule: When looking for N number of components to finish a job, you have a 95% chance of only finding N-1 of them.
-
mesherm - KT88
- Posts: 1232
- Joined: Fri Aug 27, 2004 10:33 pm
- Location: Alvin Texas
![]() by mesherm » Sun Jan 11, 2009 12:30 pm
by mesherm » Sun Jan 11, 2009 12:30 pm
Nice amp, looks great! must weigh quite a bit, with eleven pieces of iron...
Yup! The amp weighs a ton. Yellow_Light_Colorz_PDT_09
My plan now is to squirt in some silicone rubber caulking into the space between the chassis and the PT toroid. The downside will come if I ever have to remove the PT.....uhg. :boggle:
Mike's N-1 Rule: When looking for N number of components to finish a job, you have a 95% chance of only finding N-1 of them.
-
mesherm - KT88
- Posts: 1232
- Joined: Fri Aug 27, 2004 10:33 pm
- Location: Alvin Texas
8 posts
• Page 1 of 1
Who is online
Users browsing this forum: No registered users and 39 guests