Now on to testing....
Anyway...thanks for all your help here in the forum.
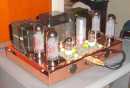
Details:
Edcor 60 output transformers
2 Toroid Corp tube power transformers
Corcom power entry module with filter
2 C.Chong capacitor boards
Mapletree "Special Red" driver board.
Soundtastic Dyna ST-70 chassis
Dynakit cover.
Lotsa NOS RCA tubes
Object was to do a true dual mono 60 wpc amp with ST-70 wrapings as I like the nostalic style and form factor.
I was going to upgrade all the components on a stock ST-70 I got on eBay, but decided just to start from scratch with all new bits (NOS for the tubes)
I've grown to love solder fumes :)
http://s130.photobucket.com/albums/p280 ... rent=2.jpg
http://s130.photobucket.com/albums/p280 ... rent=4.jpg
http://s130.photobucket.com/albums/p280 ... rent=5.jpg
http://s130.photobucket.com/albums/p280 ... rent=7.jpg
http://s130.photobucket.com/albums/p280 ... ent=10.jpg
http://s130.photobucket.com/albums/p280 ... ent=12.jpg
http://s130.photobucket.com/albums/p280 ... ent=15.jpg
Jeff Davison
Finished the wiring, another 10 lbs stuffed in a 2 lb bag
11 posts
• Page 1 of 1
Finished the wiring, another 10 lbs stuffed in a 2 lb bag
![]() by jeffdavison » Fri Jan 12, 2007 4:19 pm
by jeffdavison » Fri Jan 12, 2007 4:19 pm
- jeffdavison
- Posts: 143
- Joined: Tue Nov 21, 2006 10:22 am
- Location: Suwanee, Georgia USA
![]() by mesherm » Fri Jan 12, 2007 5:47 pm
by mesherm » Fri Jan 12, 2007 5:47 pm
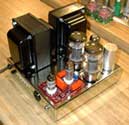
WOW!!!....and I thought I had a stuffed chassis in my latest amp. That has got to be the winner of the most amp in least cubic inch of space. I love the dual power supplies. That amp should rock and heat up your house at the same time.
Do you have the power toroids mirror imaged so that the fields cancel?
I noticed you have what looks like a bolt through the toroid and metal on each side. The toroid tranny gurus warned me against inadvertently mounting a toroid with a bolt connected to metal at both ends because it makes a secondary winding with one turn and saps current from the tranny. But I guess if you mirror image them they cancel...brilliant!!
Cool carbon fiber terminal boards too although I don't use it because I work with it every day and have tons of the stuff here...
Very nice work.
-
mesherm - KT88
- Posts: 1232
- Joined: Fri Aug 27, 2004 10:33 pm
- Location: Alvin Texas
![]() by jeffdavison » Fri Jan 12, 2007 6:32 pm
by jeffdavison » Fri Jan 12, 2007 6:32 pm
Don't quite know what you mean by mirroring. One Toroid handles the left channel, the other handles the right. they are facing "top-to-top", with the transformer on the right feeding the left and the one on the left feeding the right channel. Seemed to offer wire routing more direct with less kinking and bending. I guess you "can" called them mirrored, but not for the canceling that you suggest, though it might well work out that way.
Forgot to mention the bias pots for each tube and the single 4pdt switch for the triode-ultralinear modes for left and right channels at the same time. But I guess you all can see that in the pics. also the CL90s.
I know about grounds and the toroids. The mounting bolt that goes through both toroids is brass and aluminum - both non magnetic to help avoid coupling, and the bolts are completely insulated from the side mounting plates with heavy rubber bushing/grommets, so the mounting bolt is not electrically connected to ground.
I still have enough space for t timed B+ relay boards I got from Sophia, but since I'm using the indirect heat Mullard GZ34/5AR4's I really don't need them.
I have a heavily modded Thorens TD160 with alot of carbon fiber bits, both for function and decoration (sub-chassis and arm board). Had some left over to use as mounting plates and add "just" a touch of exterior tweaking. Did the same for my modified Moscode "Super-It" that I'm using as a minimalist preamp. You should se how I modified my original Advents...Accuton & Raven MTM's now.
My system only "looks" like it's from the '70's
JD
- jeffdavison
- Posts: 143
- Joined: Tue Nov 21, 2006 10:22 am
- Location: Suwanee, Georgia USA
![]() by mesherm » Fri Jan 12, 2007 7:36 pm
by mesherm » Fri Jan 12, 2007 7:36 pm
All those NOS tubes must have set you back a few pesos too. The 5AR4s and the 6550s...wheeewwww.
On the subject of triode mode.
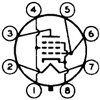
I assume you are using 100 ohm resistors on the screen grids. On all my triode connected amps I wired in a UF4007 diode with the anode connected to the plate supply before the 100 ohm resistor. That is supposed to increase the power by blocking any AC through the screen grid but still keep the DC applied. You might try it if you haven't wired it up like that already. Puts a bit more music power to the speakers in triode mode....weeeee
http://www.webace.com.au/~electron/tubes/triode.htm
On the subject of triode mode.
I assume you are using 100 ohm resistors on the screen grids. On all my triode connected amps I wired in a UF4007 diode with the anode connected to the plate supply before the 100 ohm resistor. That is supposed to increase the power by blocking any AC through the screen grid but still keep the DC applied. You might try it if you haven't wired it up like that already. Puts a bit more music power to the speakers in triode mode....weeeee
http://www.webace.com.au/~electron/tubes/triode.htm
-
mesherm - KT88
- Posts: 1232
- Joined: Fri Aug 27, 2004 10:33 pm
- Location: Alvin Texas
![]() by jeffdavison » Fri Jan 12, 2007 10:31 pm
by jeffdavison » Fri Jan 12, 2007 10:31 pm
I'm a sucker for curved glass...
Read the article and your note.. I'm more of a visual person (I'd rather read a map than go by written down directions) so forgive me a bit here...
Just a bit of clarification... you say you wired the diode with the anode "before" the 100 ohm resistor.... now would that be on the "tube" side of the resistor or the "away" side? I am assuming that the diode runs across the screen lead and the plate lead from the output transformer. That is where I basically where I have the Triode/UL switch. The way I have the swich wired is that the center terminal has the 100 ohm resistor connected to the screen (pin 4), one terminal connected to the plate (pin3)and the plate lead from the output transformer, and the other terminal only connected to the screen lead from the output transformer. This way I always keep the 100 ohm resistor in circuit, so when not in triode mode, the resistor is there to stabilise the screen...
So, I am trying to get my minds eye around how to "insert" the diode into circuit as it would have to be there in the U.L mode as well and am not sure what it will do. If the diode is on the "away" side of the screen resistor, could I just wire it across the leads onthe terminal of the switch? (i.e. the terminal with the screen resistor and the plate lead terminal?)
JD
[quote="mesherm"] I assume you are using 100 ohm resistors on the screen grids. On all my triode connected amps I wired in a UF4007 diode with the anode connected to the plate supply before the 100 ohm resistor. That is supposed to increase the power by blocking any AC through the screen grid but still keep the DC applied.
Last edited by jeffdavison on Fri Jan 12, 2007 10:48 pm, edited 2 times in total.
- jeffdavison
- Posts: 143
- Joined: Tue Nov 21, 2006 10:22 am
- Location: Suwanee, Georgia USA
![]() by jeffdavison » Fri Jan 12, 2007 10:35 pm
by jeffdavison » Fri Jan 12, 2007 10:35 pm
It's amazing what a mirror and photoshop can accomplish... :) ..Thanks, no photochopping this amp! I think I have depleted the worlds supply of caffiene by a large margin with this project.
if I had literally only 1/8" more space on each side of the amp, I could have put in a pair of 100 wpc Edcors. If I put them in this amp, they would just touch the power transformes and be much to close to the rectifier tubes where they might get a bit too warm. They are physically smaller than Dyna, Magna, and Hammond iron. It was very tempting but I wanted to be "just" a little conservative.
JD
sorenj07 wrote:WOW... that's the most densely packed amp I've seen in quite a while. What is it now, a stereo 120? Congratulations on a really cool job, in an incredibly small package :)
- jeffdavison
- Posts: 143
- Joined: Tue Nov 21, 2006 10:22 am
- Location: Suwanee, Georgia USA
![]() by mesherm » Fri Jan 12, 2007 11:19 pm
by mesherm » Fri Jan 12, 2007 11:19 pm
no need for the diode in UL mode so just unsolder the wire at the switch coming from the plate and solder the diode striped side to the switch (where the wire was) then solder the lead from the plate to the other side of the diode (without the band). One for each tube.
-
mesherm - KT88
- Posts: 1232
- Joined: Fri Aug 27, 2004 10:33 pm
- Location: Alvin Texas
![]() by jeffdavison » Fri Jan 12, 2007 11:45 pm
by jeffdavison » Fri Jan 12, 2007 11:45 pm
gotcha....
so basically the diode is just spliced "in line" becoming a section of the plate lead with the cathode (striped side) away from the tube and the anode (no stripe side) towards the tube.
anywhere between the tube and the switch? doesn't need to be close to the tubes as the resistors need be?
Thanks
JD
mesherm wrote:no need for the diode in UL mode so just unsolder the wire at the switch coming from the plate and solder the diode striped side to the switch (where the wire was) then solder the lead from the plate to the other side of the diode (without the band). One for each tube.
- jeffdavison
- Posts: 143
- Joined: Tue Nov 21, 2006 10:22 am
- Location: Suwanee, Georgia USA
11 posts
• Page 1 of 1
Who is online
Users browsing this forum: No registered users and 10 guests