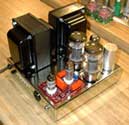
Well, I haven't yet had a chance to try any of the suggestions for better pictures so kindly given to me on another thread. But these turned out OK so though I'd share them. Just finished this the other night...
http://joeriz.myphotoalbum.com/albums.php
Enjoy!
Joe
Pics of my DIYtube ST-70
14 posts
• Page 1 of 1
Pics of my DIYtube ST-70
![]() by joeriz » Thu Jan 24, 2008 10:03 am
by joeriz » Thu Jan 24, 2008 10:03 am
- joeriz
- Posts: 102
- Joined: Thu Jun 01, 2006 12:34 pm
![]() by SDS-PAGE » Thu Jan 24, 2008 10:22 am
by SDS-PAGE » Thu Jan 24, 2008 10:22 am
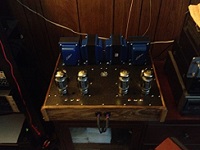
Great looking amps and pictures! I like how you made the wooden cover for the ST-70 PCB. I think wood goes well with metal if done right.
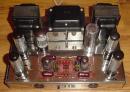
BTW, I noticed that you don't have any strain relief for the AC cord on your ST-35.
BTW, I noticed that you don't have any strain relief for the AC cord on your ST-35.
-

SDS-PAGE - KT88
- Posts: 865
- Joined: Thu Feb 22, 2007 4:41 pm
- Location: Brandon, SD
![]() by Slartibartfast » Thu Jan 24, 2008 10:43 am
by Slartibartfast » Thu Jan 24, 2008 10:43 am
SDS-PAGE wrote:Great looking amps and pictures! I like how you made the wooden cover for the ST-70 PCB. I think wood goes well with metal if done right.
BTW, I noticed that you don't have any strain relief for the AC cord on your ST-35.
There appears to be a oose knot in the power cord on the inside of the case. That is some amount of relief and the way they were originally done.
Or am I totally missing something?
Robert
-

Slartibartfast - KT88
- Posts: 458
- Joined: Sun Apr 15, 2007 9:40 pm
- Location: Columbia S.C.
![]() by joeriz » Thu Jan 24, 2008 11:53 am
by joeriz » Thu Jan 24, 2008 11:53 am
Thanks for the compliments guys.
oooh...picky picky :laugh:
Yes, only a knot which is fine for now...I'm not terribly rough on the power cord or anything. Someday I'll get around to putting a grommet or real strain relief in there.
Joe
BTW, I noticed that you don't have any strain relief for the AC cord on your ST-35.
oooh...picky picky :laugh:
Yes, only a knot which is fine for now...I'm not terribly rough on the power cord or anything. Someday I'll get around to putting a grommet or real strain relief in there.
Joe
- joeriz
- Posts: 102
- Joined: Thu Jun 01, 2006 12:34 pm
![]() by TomMcNally » Thu Jan 24, 2008 12:53 pm
by TomMcNally » Thu Jan 24, 2008 12:53 pm
The knot is fine !
In assembling an amp with the D-shaped hole for one
of those hard plastic "Heyco" strain relief things, I curse
and yell quite a bit trying to squeeze those stupid things
into place.
Nice job on the amps - very classy styling !
... tom
In assembling an amp with the D-shaped hole for one
of those hard plastic "Heyco" strain relief things, I curse
and yell quite a bit trying to squeeze those stupid things
into place.
Nice job on the amps - very classy styling !
... tom
-

TomMcNally - Darling du Jour
- Posts: 2729
- Joined: Sat Nov 19, 2005 2:19 pm
- Location: Northfield, NJ
![]() by EWBrown » Thu Jan 24, 2008 1:52 pm
by EWBrown » Thu Jan 24, 2008 1:52 pm
Tom
Sounds like you need one of those Heyco Bushing squeezer tools, I'll check my stash, I may have an extra one laying about... Much nicer than using pliers or finger pressure, and a lot less !@#$%^&*()! in the process...
/ed B in NH
Sounds like you need one of those Heyco Bushing squeezer tools, I'll check my stash, I may have an extra one laying about... Much nicer than using pliers or finger pressure, and a lot less !@#$%^&*()! in the process...
/ed B in NH
Real Radios Glow in the Dark
-

EWBrown - Insulator & Iron Magnate
- Posts: 6389
- Joined: Wed Mar 19, 2003 6:03 am
- Location: Now located in Clay County, NC !
Re: Pics of my DIYtube ST-70
![]() by hilldweller » Thu Jan 24, 2008 10:12 pm
by hilldweller » Thu Jan 24, 2008 10:12 pm
joeriz wrote:Well, I haven't yet had a chance to try any of the suggestions for better pictures so kindly given to me on another thread. But these turned out OK so though I'd share them. Just finished this the other night...
http://joeriz.myphotoalbum.com/albums.php
Enjoy!
Joe
Schweet!!! I'm jealous! I need to tweak my building skills! Yellow_Light_Colorz_PDT_11
Analog is Real! Experience it!
Digital leads to trans humanism. Not good.
Digital leads to trans humanism. Not good.
-
hilldweller - KT88
- Posts: 285
- Joined: Wed Aug 01, 2007 5:28 pm
- Location: St. Louis Missouri USA
![]() by hilldweller » Thu Jan 24, 2008 10:15 pm
by hilldweller » Thu Jan 24, 2008 10:15 pm
TomMcNally wrote:The knot is fine !
In assembling an amp with the D-shaped hole for one
of those hard plastic "Heyco" strain relief things, I curse
and yell quite a bit trying to squeeze those stupid things
into place.
Nice job on the amps - very classy styling !
... tom
The key is to "preform them on the cord overnight with a suitable clamp!" After 24 hours, they pop right in! Yellow_Light_Colorz_PDT_12
Analog is Real! Experience it!
Digital leads to trans humanism. Not good.
Digital leads to trans humanism. Not good.
-
hilldweller - KT88
- Posts: 285
- Joined: Wed Aug 01, 2007 5:28 pm
- Location: St. Louis Missouri USA
![]() by Shannon Parks » Fri Jan 25, 2008 6:02 am
by Shannon Parks » Fri Jan 25, 2008 6:02 am
The wood panels make me think of the old Woodies. Sharp!
- designer of fine tube audio gear at (((parks audio)))
- founder and admin of the diytube forums
-

Shannon Parks - Site Admin
- Posts: 3764
- Joined: Tue Mar 18, 2003 5:40 pm
- Location: Poulsbo, Washington
-
Sal Brisindi - KT88
- Posts: 374
- Joined: Thu Mar 22, 2007 5:21 am
- Location: Freehold N.J.
![]() by TomMcNally » Fri Jan 25, 2008 8:33 am
by TomMcNally » Fri Jan 25, 2008 8:33 am
The key is to "preform them on the cord overnight with a suitable clamp!" After 24 hours, they pop right in!
24 hours ! That's a long time to wait on an amp that only
takes 2 hours to build ! Yellow_Light_Colorz_PDT_20
-
TomMcNally - Darling du Jour
- Posts: 2729
- Joined: Sat Nov 19, 2005 2:19 pm
- Location: Northfield, NJ
![]() by hilldweller » Fri Jan 25, 2008 5:02 pm
by hilldweller » Fri Jan 25, 2008 5:02 pm
TomMcNally wrote:The key is to "preform them on the cord overnight with a suitable clamp!" After 24 hours, they pop right in!
24 hours ! That's a long time to wait on an amp that only
takes 2 hours to build ! Yellow_Light_Colorz_PDT_20
Yea, I guess that can be a problem if your in production mode. Works great for hobby mode. Try heating the cord with a heat gun first.
Analog is Real! Experience it!
Digital leads to trans humanism. Not good.
Digital leads to trans humanism. Not good.
-
hilldweller - KT88
- Posts: 285
- Joined: Wed Aug 01, 2007 5:28 pm
- Location: St. Louis Missouri USA
14 posts
• Page 1 of 1
Who is online
Users browsing this forum: No registered users and 99 guests