ST70 Clone - point to point wiring.... ITS ALIIIIIVEEEEE

knowledge base for the classic Dynaco ST70

ST70 Clone - point to point wiring.... ITS ALIIIIIVEEEEE

Postby parabellum » Mon Aug 13, 2007 10:44 pm

I finally finished my ST70 clone yesterday. Yellow_Light_Colorz_PDT_02

It was a major PITA but it got done.

It could not have gotten done without Mike's unselfish help. I literally ran out of words to thank him for all his help.

What was especially cool about the project besides that it is my first tube amp is that i built it with my father. We haven't worked on anything together for a long time and it was beyond cool to get him interested in something like this again. He was building tube amps long before I was born not out of a hobby but more out of a necessity :D

Anyhow here is a pic and I think i'll post a bunch of pics bellow from different build stages.


Image
Last edited by parabellum on Sat Apr 18, 2009 10:14 pm, edited 1 time in total.
User avatar
parabellum
 
Posts: 195
Joined: Wed Apr 25, 2007 1:37 pm
Location: Bay Area, CA

Postby parabellum » Mon Aug 13, 2007 11:15 pm

Once all the parts got in it was time to start
Image

Top plate is aluminum. Note my work area ie. my kitchen table with the stool i use for sitting down while tying shoes used for drilling holes through the handle hole.
Image


Here is the back panel built out of oak board. The plug for the power jack was made by drilling a bunch of tiny holes then cutting it out and filling it till my arms fell off.
Image


The bottom part made out of plywood. I drilled the holes for let some air in.
Image


Beer and a puny pumpkin used to put the pressure on the glued construction. Harp bear sucks. Someone brought it to me and its been sitting in my closet for a while now.
Image


I was painting in front of my door to the horror of my 100 year old neighbors. I hijacked the laundry drying thingy to dry the primer paint.
Image


I'm guessing neighbors didn't like the square created after I removed the inadequate plastic cover I was using
Image


Slap some primer on.
Image


Now that the primer is done time to slap some color on it. Its colonial red, and before you ask me why red let me preemptively answer and say thats the closest I could find to mohagony at home depot.
Image


After a few coats of colonial red time to let it dry a bit.
Image


Couldn't find a way to hang the top plate onto the drying contraption so I hung in on the balcony overnight.
Image


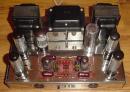
Mount the sockets and the transformer.And start fitting it all together.
Image


Slap the sides on.
Image


I thought i was pretty clever when I though of putting the biasing pots together up front and hiding them behind a brass plate for easy access. Had I known how much of a pain in the ass that will turn into I would have scrapped that idea.
Image


Back side almost complete. Later I put some banana jacks and made them into biasing points.
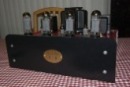
Image


Finished box.
Image

Image


Back view before I put them biasing jacks there as well.
Image


Now that the wood and metal work is out of the way time to get down to business. Here is a schematic I drew on a single piece of paper so I have a big picture in my head.
Image


Let the games begin. Pay no attention to the analog meter, My digital one crapped out and I was waiting for the new one in the mail.
Image


Trying our best to keep it neat but point to point gets busy fast!
Image
Image


Almost there
Image


Call the bomb squad I don't know which wire to cut!!!
Image


After some grief filled day of troubleshooting all the things wrong whose details I wont bother you with. It was ready to be tried out with some input.
I grabbed a very first CD I had near me (turned out it was Johnny Cash) and slapped it into the PS 1 which works only about 10% of the time and hooked up the dynaco A25s. With no preamp or volume control I turned it on and hoped for the best. And then BLAAAAAAAAAAM. Johnny came out at full volume shaking walls. I was jumping up and down like a retard not wanting to shut it off.
Image

Oh yeah baby. It was a good day!
Image
Last edited by parabellum on Sat Apr 18, 2009 10:17 pm, edited 1 time in total.
User avatar
parabellum
 
Posts: 195
Joined: Wed Apr 25, 2007 1:37 pm
Location: Bay Area, CA

Postby Shannon Parks » Tue Aug 14, 2007 5:27 am

Very impressive project and documentation! You should be proud. I particularly like the 'bomb squad' pic. Thanks for sharing it with us.
User avatar
Shannon Parks
Site Admin
 
Posts: 3764
Joined: Tue Mar 18, 2003 5:40 pm
Location: Poulsbo, Washington

Postby dhuebert » Tue Aug 14, 2007 7:36 am

What transformers did you use?

Don
User avatar
dhuebert
KT88
 
Posts: 820
Joined: Thu May 01, 2003 9:26 am
Location: Winnipeg Manitoba Canada

Postby TomMcNally » Tue Aug 14, 2007 8:28 am

Sweet ! Congratulations from another kitchen counter builder.

... tom
User avatar
TomMcNally
Darling du Jour
 
Posts: 2729
Joined: Sat Nov 19, 2005 2:19 pm
Location: Northfield, NJ

Postby SDS-PAGE » Tue Aug 14, 2007 8:47 am

Very nicely done! It looks like you put a lot of thoughts into it. It's cool that you got to work with your dad too. Hope it will last to be a family heirloom. So, what's your next project? -Min
User avatar
SDS-PAGE
KT88
 
Posts: 865
Joined: Thu Feb 22, 2007 4:41 pm
Location: Brandon, SD

Postby parabellum » Tue Aug 14, 2007 9:43 am

@shannon

Thanks. Yeah the bomb squad pic looks scary :o I got many more pics from every possible stage of the build. I figgured someone might find it usefull one day.


@dhubert

Hammond 372JX PT and Hammond 1645 OTs

@Tom

Thanks Tom :)

@Min

Yep, I drew various prototypes before I even got all the parts in one pile. But I learned that this is not a way to go when working with wood. Too much effort and too many unpredictible behaviours.

And yeah I don't plan to get rid of this thing ever. Too much effort to put a price on.

Next project is a preamp designed by Mike, 2A3 SET amp with a new concept for a chassis I thought of. And after that some hopefully kickass looking single driver speakers. Yellow_Light_Colorz_PDT_11
User avatar
parabellum
 
Posts: 195
Joined: Wed Apr 25, 2007 1:37 pm
Location: Bay Area, CA

Postby wiredbecker » Tue Aug 14, 2007 12:46 pm

Dude! That rules!! Big congratulations to you and your dad. Any chance I could convince you to bring it over in a few weeks? We could cycle through my speaker collection or something.
User avatar
wiredbecker
KT88
 
Posts: 301
Joined: Mon Mar 26, 2007 3:48 pm
Location: Albany Landfill, CA

Postby parabellum » Tue Aug 14, 2007 6:27 pm

Thanks Chris. We'll arrange something after I break the tubes in and finish the preamp. The preamp won't take this long since its infinitely simpler and will just be a utaliterian off the shelf ugly aluminum box.
User avatar
parabellum
 
Posts: 195
Joined: Wed Apr 25, 2007 1:37 pm
Location: Bay Area, CA

Postby Sal Brisindi » Wed Aug 15, 2007 8:05 pm

Awesome job on the amplifier, I hope it sounds as good as it looks!

Regards,
Sal Brisindi
User avatar
Sal Brisindi
KT88
 
Posts: 374
Joined: Thu Mar 22, 2007 5:21 am
Location: Freehold N.J.

Postby parabellum » Thu Aug 16, 2007 12:00 pm

Thanks Sal, I hope so too :)
User avatar
parabellum
 
Posts: 195
Joined: Wed Apr 25, 2007 1:37 pm
Location: Bay Area, CA


Return to st70

Who is online

Users browsing this forum: No registered users and 79 guests