I need a mentor to help me through this project! I bought this kit expecting to have more detailed plans. I'll probably have quite a few questions, many of which a seasoned builder will consider simplistic. I'm dedicated to building this thing so that I can learn and go on to more rewarding builds. Abundant thanks if you are willing to help!
Q#1 There are three little tear-drop shaped metal lock washers with intergral solder points. Where do these go?
Rookie seeks help w/DIY Stereo 35 build
14 posts
• Page 1 of 1
Rookie seeks help w/DIY Stereo 35 build
![]() by cliffpickle » Thu Aug 14, 2008 7:14 am
by cliffpickle » Thu Aug 14, 2008 7:14 am
- cliffpickle
- Posts: 7
- Joined: Tue Aug 12, 2008 6:20 am
- Location: Gulf Shores, AL
![]() by Ty_Bower » Thu Aug 14, 2008 9:07 am
by Ty_Bower » Thu Aug 14, 2008 9:07 am
I always enjoy watching a new ST35 get built. I'll offer suggestions where I can. Do you have a digital camera? Photos help a lot with the troubleshooting. I can't quite imagine what a teardrop shaped lock washer thingy would be. Maybe an attachment ring to go on the speaker binding post?
From where did you get the kit? Is it a full kit (board, passives, chassis, and misc)?
My advice would be to take your time and solder in parts one by one. I've seen people stuff the whole board and solder everything at once, but I work a lot slower than that. Use a multimeter and check every resistor before you put it in. It's too easy to misread a color band and stick a 1K part where you needed a 100K. Mind the polarity on the electrolytic capacitors. If you put them in backwards, they will blow up. A good soldering iron will make you happier in the long run. I've got a cheap Radio Shack $5 iron which is too hot, and it tends to overheat the board (and lift traces) if I'm not careful with it.
Search the forum for photos of assembled boards, and use them as a reference. I'd post links to the boards I've used, but they are Rev B and Rev C. They're not going to exactly match your board (which I assume is Rev D).
-
Ty_Bower - KT88
- Posts: 1494
- Joined: Wed Mar 21, 2007 2:50 pm
- Location: Newark, DE
Rookie with St35 Question
![]() by cliffpickle » Thu Aug 14, 2008 9:50 am
by cliffpickle » Thu Aug 14, 2008 9:50 am
Ty:
Thanks for your reply-you are very kind to offer your help.
1. I bought the ST-35 kit from Triode Electronics--full kit package.
2. These little metal clips do resemble something you would see at a driver terminal. They are about 1/2" long, one end has about a 3/16" hole with 'spurs' as found on a lockwasher, the other, smaller end has a hole, abour 1/16" apparently for soldering a wire to this end. They are very thin, (maybe a better description would be pear-shaped) and I would guess they are to be placed under a screw attached to the chassis for attachment of a (ground?).
3. I do have a dig camera, so maybe as things progress, I may need to take some pictures for reference--Good Idea...
Thanks--Chuck
- cliffpickle
- Posts: 7
- Joined: Tue Aug 12, 2008 6:20 am
- Location: Gulf Shores, AL
![]() by mesherm » Thu Aug 14, 2008 1:57 pm
by mesherm » Thu Aug 14, 2008 1:57 pm
These little metal clips do resemble something you would see at a driver terminal. They are about 1/2" long, one end has about a 3/16" hole with 'spurs' as found on a lockwasher, the other, smaller end has a hole, abour 1/16" apparently for soldering a wire to this end. They are very thin, (maybe a better description would be pear-shaped) and I would guess they are to be placed under a screw attached to the chassis for attachment of a (ground?).
That is indeed what they are used for. They are commonly called solder lugs. Some have the lockwasher feature some are plain. I would guess that at least one is used under the screw of a tranny or maybe the choke and the green safety ground wire from the power plug gets soldered to it.
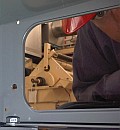
Here is an "underhood" photo of an ST35 I built long ago.
http://webpages.charter.net/mesherm/diy35/PB250004.jpg
Mike's N-1 Rule: When looking for N number of components to finish a job, you have a 95% chance of only finding N-1 of them.
-
mesherm - KT88
- Posts: 1232
- Joined: Fri Aug 27, 2004 10:33 pm
- Location: Alvin Texas
![]() by Ty_Bower » Thu Aug 14, 2008 8:19 pm
by Ty_Bower » Thu Aug 14, 2008 8:19 pm
There are three transformers, and three of these pear shaped things. Maybe it's not coincidence. I'm trying to figure out why you'd need a grounding lug (for each transformer) on a steel chassis, though.
Tom has built at least one of the Triode kits, and most likely more. Take a look at his photos in his thread.
http://www.diytube.com/phpBB2/viewtopic.php?t=1965
Tom has built at least one of the Triode kits, and most likely more. Take a look at his photos in his thread.
http://www.diytube.com/phpBB2/viewtopic.php?t=1965
-
Ty_Bower - KT88
- Posts: 1494
- Joined: Wed Mar 21, 2007 2:50 pm
- Location: Newark, DE
![]() by TomMcNally » Thu Aug 14, 2008 9:28 pm
by TomMcNally » Thu Aug 14, 2008 9:28 pm
I only used one solder lug ... on the IEC connector ground, you
can't see it in this picture, but you can see the heavy ground wire.
You don't need them anywhere in the amp.

can't see it in this picture, but you can see the heavy ground wire.
You don't need them anywhere in the amp.
-

TomMcNally - Darling du Jour
- Posts: 2729
- Joined: Sat Nov 19, 2005 2:19 pm
- Location: Northfield, NJ
Rookie seeks help with ST-35 Build
![]() by cliffpickle » Fri Aug 15, 2008 6:44 am
by cliffpickle » Fri Aug 15, 2008 6:44 am
Thanks to all! This is the kind of help I need, but frankly didn't expect!
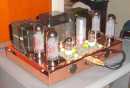
It is encouraging to find this kind of support--I now have a much better mindset going ito this project knowing there are folks out there willing to share their time to help. The pictures of the PCB are truly worth the 1M words...
Chuck
It is encouraging to find this kind of support--I now have a much better mindset going ito this project knowing there are folks out there willing to share their time to help. The pictures of the PCB are truly worth the 1M words...
Chuck
- cliffpickle
- Posts: 7
- Joined: Tue Aug 12, 2008 6:20 am
- Location: Gulf Shores, AL
rookie seeks help with ST-35 kit build
![]() by cliffpickle » Fri Sep 05, 2008 10:09 am
by cliffpickle » Fri Sep 05, 2008 10:09 am
Reboud from the rookie:
I asked for some help from the kit supplier and received a reply which requires some clarification. Help, please!
My kit included a C354-EB choke, but no instructions on wiring it, so I asked about that.
The supplier notes that either the choke or two resistiors (R34, R35)may be used interchangeably. Will someone give me an opinion as to the more favorable configuration? Maybe some pros & cons....
Thanks, again,
Chuck
- cliffpickle
- Posts: 7
- Joined: Tue Aug 12, 2008 6:20 am
- Location: Gulf Shores, AL
![]() by TomMcNally » Fri Sep 05, 2008 10:34 am
by TomMcNally » Fri Sep 05, 2008 10:34 am
Hi Chuck -
I hope you are progressing well on your amp.
If you look at the picture of the bottom of the one I
built, you can see how to hook the choke up.
Leave the resistors out, hook the two wires of the
choke to the two pins. A terminal strip would be
nice if you have one, otherwise, do as I did and solder it.
The choke is better, but the design of the amp is good,
so the resistors are good too. It's just another bit
less noise from the power supply using the choke.
-
TomMcNally - Darling du Jour
- Posts: 2729
- Joined: Sat Nov 19, 2005 2:19 pm
- Location: Northfield, NJ
Rookie w/ST-35
![]() by cliffpickle » Fri Sep 05, 2008 1:30 pm
by cliffpickle » Fri Sep 05, 2008 1:30 pm
Tom,
Thanks, again, for your support.
Your posted pictures have been a great help, and have answered several questions for me. Maybe you should petition the folks at Triode Elec. for a little retainer fee...
Chuck
Thanks, again, for your support.
Your posted pictures have been a great help, and have answered several questions for me. Maybe you should petition the folks at Triode Elec. for a little retainer fee...
Chuck
- cliffpickle
- Posts: 7
- Joined: Tue Aug 12, 2008 6:20 am
- Location: Gulf Shores, AL
![]() by TomMcNally » Fri Sep 05, 2008 2:02 pm
by TomMcNally » Fri Sep 05, 2008 2:02 pm
No problem Chuck ....
It's not Triode's board, the board was designed and
manufactured by Shannon Parks from diytube, and
we support it here on our board.
Triode makes up a nice kit, with their transformers
and chassis, and supplies the parts, but the board
comes from here.
Let us know how you make out, and all questions
are welcome !
... tom
-
TomMcNally - Darling du Jour
- Posts: 2729
- Joined: Sat Nov 19, 2005 2:19 pm
- Location: Northfield, NJ
![]() by Ty_Bower » Fri Sep 05, 2008 2:57 pm
by Ty_Bower » Fri Sep 05, 2008 2:57 pm
I've wired up two ST35 amps; neither one had the choke. I can't say that I miss it, but if I had one I'd certainly use it. I can't think of any cons to using the choke unless you had to pay extra for it.
-
Ty_Bower - KT88
- Posts: 1494
- Joined: Wed Mar 21, 2007 2:50 pm
- Location: Newark, DE
gilding th elily
![]() by EWBrown » Sun Sep 14, 2008 7:59 pm
by EWBrown » Sun Sep 14, 2008 7:59 pm
The choke (1.5H, 200 mA, 56 ohms DCR) isn't absolutely necessary, but it does help to remove that little tiny bit of residual 120Hz ripple which is sometiomes apparent, when using very high efficiency speakers (like vintage Altec Voice of the Theater or larger Klipsch Horns) for those who are really critical about such things. In 99% of most situations, this ripple is inaudible.
I've used the choke in "vintage" Dyna ST-35 and SCA-35 rebuilds, as the original PSU has a LOT less capacitance than does the DIY35, and in those cases, the choke does make a noticeable improvement. For a cost of around ten to twelve bucks, it is a worthwhile "upgrade".
As Tom says, it replaces the 50 ohm (or two 100 ohms in parallel) resistor in the PSY string.
/ed B aka Hum-Free Bogart
Real Radios Glow in the Dark
-

EWBrown - Insulator & Iron Magnate
- Posts: 6389
- Joined: Wed Mar 19, 2003 6:03 am
- Location: Now located in Clay County, NC !
![]() by K-MAN » Sun Sep 14, 2008 11:20 pm
by K-MAN » Sun Sep 14, 2008 11:20 pm
Have you worked on electronics much before? I'm glad that these kits are being made again, there the perfect way to learn all the skills. I found the hardest thing was soldering properly, It just takes lots of practice but tinning all your leads and cleaning all your connections really well is the main thing. Good luck with the build and remember if you get frustrated to leave it for awhile or you end up making more mistakes like I did.
-

K-MAN - Posts: 160
- Joined: Thu Nov 30, 2006 5:12 am
14 posts
• Page 1 of 1
Who is online
Users browsing this forum: No registered users and 10 guests