Planning a 5AR4 Rectified, Oil Cap diytube ST35

for the DIY ST35, the Dynakit and every other PP EL84

Planning a 5AR4 Rectified, Oil Cap diytube ST35

Postby dbishopbliss » Thu Oct 18, 2007 12:39 pm

I've built a number of tube amp kits without any issues ever, so I can follow directions and solder, but when it comes to design and theory I know nothing.

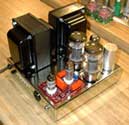
I recently bought a pair of MQ Output transformers and a custom Electraprint Power transformer for a diytube ST35 (still waiting for it to arrive. An unfinished project from a well intentioned enthusiast). The power transformer was spec'd for tube rectification.

I would like to take a slightly different approach to the traditional layout for the ST35. I want to have the power supply on one end of the chassis and the input/output section on the other. I also want to use Polypropylene and Oil caps in the power supply (no reason other than I've heard they sound better and I think they look cool).

Image

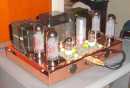
You will notice I have the board backwards. J1 is towards the front of the chassis. This will allow me to run the power supply wires along the front of the chassis away from the input and outputs. Having the J6 and J7 connectors towards the back will let me have short runs from the input jacks.

The chassis is 8 inches deep by 17 inches wide. The transformers are placed so they are 1/2 inch from the edge of the chassis. The diytube board is also 1/2 inch from the edge of the chassis. There is 3/4 inch betwen the board, output transformer and the Oil Caps.

I plan on using Mills non-inductive resistors for the power supply. I am thinking about using Rikens for the rest of the resistors (depending upon how wealthy I'm feeling). Maybe it would make more sense to use metal film in some places and Rikens in others. I would also like to upgrade the caps, etc where it makes sense.

Please comment (but be kind because I really only know enough to be dangerous). If you have recommendations for resistors and/or caps, it would be very helpful to me to include a value and reference number with your recommendation. If you just say, "output coupling cap" or "grid stop resistor" it doesn't help me much because I don't know which ones those are.

Thanks in advance for your advice.
dbishopbliss
 
Posts: 13
Joined: Mon Sep 17, 2007 8:37 pm

Postby WA4SWJ » Sat Oct 20, 2007 6:34 am

Hi,

Looks like you did not receive any answers. I'll make a couple of comments.

Your layout looks just fine. It doesn't matter a whole lot how you lay it out. What you have shown should work great.

As for components - using the parts that Shannon has in his parts list will provide a great amplifier. There is not a huge difference between passive components in my opinion. There is a new post regarding putting amps on a scope in this part of the forum that shows some results from Shannon's ST-35 design. The waveforms I posted were from my amp that uses the parts right from Shannon's list. It's a great amplifier design. Your transformers should be very good.

The only other thing I would suggest is that you obtain a NOS 5751 for the 12AX7 and a NOS 12BH7 for the 12AU7. I replaced some new JJ tubes that I originally had in there with these NOS tubes and the amp absolutely came alive. The 6BQ5's can be JJ or Sovtek or NOS as well. Overall, the only thing that made a huge difference in my ST-35 was the voltage amp and phase inverter tubes. It sounds fantastic now.

Hope this helps. You're about to build a very nice amplifier. We'd all appreciate seeing some pictures when you're finished!

Regards,
Ed Long
User avatar
WA4SWJ
KT88
 
Posts: 650
Joined: Mon Dec 27, 2004 8:39 pm
Location: Belleview, FL

Postby chrish » Fri Oct 26, 2007 6:24 am

I have not built this particular amp, but I have built a "SimpleSE" by TubeLab http://www.tubelab.com/SimpleSE.htm

The layout I used was very similar to what you propose. The only thing I did different to you was to put the power supply components on the left side of the chassis. Not sure where the power connections are on the PC Board you are using, so this may not be practical. Most electronic gear tends to have the power switch on the left hand side. If you want to do this, then placing the pwer supply on the left side would make for shorter wiring of mains to and from the power switch.

Also, from the look of your layout, you have room to put a choke in front of the power transformer too.

Good luck with the project,

Chris
chrish
 
Posts: 102
Joined: Fri Oct 26, 2007 5:33 am
Location: Sydney, Australia

More detail... looking for opinions

Postby dbishopbliss » Fri Dec 14, 2007 4:16 pm

Image

I may have gone a little over-board with the power supply here but its what I plan on going with. I'm looking for more input about the routing of wires, etc rather than feedback on the cap values, etc.

The image is to scale. The power transformer is a custom build by electraprint. In front of the transformer is a large hammond choke with bell ends so that it will be on top of the chassis. In front of that is a 5AR4 tube rectifier.

The larger circles to the left of the transformer are 100uf Oil capsThe smaller circle is a 20uf Oil cap.

I'm mostly wondering what people think about my leaving the board's power supply empty and running from the positive terminal of the 20uF cap directly to where the positive terminal of C12 would go.

I plan on routing all the wires along the edge of the chassis up front to keep them away from the input and outputs. What do you think about the ground bus indicated by the red-striped line? Would it be better to run separate wires from each cap (star ground like) or will this do?

The amp will also be wired for triode-mode that is why there are no UL wires shown coming from the output transformers.

Lots and lots of other changes from the stock implementation, but I will hold off with details until I actually get everything connected and can give a listening impression.
dbishopbliss
 
Posts: 13
Joined: Mon Sep 17, 2007 8:37 pm

Postby mesherm » Fri Dec 14, 2007 11:07 pm

I think I see what your trying to do. IF you connect your B+ to C12 you will have to replace R32 and R33 with jumpers since the EL84s power is tapped at C10. That would assume your new B+ is 320 vdc which is a bit low. If your actual B+ is higher maybe you shoud connect at C10 and leave R32 and R33 in place to drop the voltage for the VA/PI stages.

OR did you intend to wire from the 100uf oils to C10 to power the EL84s. Then you could leave out R32 33 and all the jumpers and run the wire from the 20uf to C12 as you show. I just didn't see a connection to C10 on your drawing.
Mike's N-1 Rule: When looking for N number of components to finish a job, you have a 95% chance of only finding N-1 of them.
User avatar
mesherm
KT88
 
Posts: 1232
Joined: Fri Aug 27, 2004 10:33 pm
Location: Alvin Texas

Postby chrish » Sat Dec 15, 2007 9:34 am

I am curious why you have the 20uF cap as the last in the chain, and it looks like it is decoupled with a resistor. My understanding is that with a big current draw from the amplifier, you will discharge the 20uF cap quickly and then the 100uF caps will be trying to push current through that resistor to supply the demand. Oil caps are good because they have low resistance. My (limited) understanding is that you have effectively bypassed their advantage by putting that resistor in there. Maybe a better approach would be to use a standard 47uF - choke - 120uF filter using electrolytic caps, then one 100uF oil filled cap to power each pair of EL84s. This puts the low ESR cap where it is needed. This is the approach I have planned for my next EL84 PP project, and also the approach taken in the SimpleSE EL34 single ended project I have built.

Good luck with the project!

Chris
chrish
 
Posts: 102
Joined: Fri Oct 26, 2007 5:33 am
Location: Sydney, Australia

Postby Ty_Bower » Sat Dec 15, 2007 9:54 am

I think it would make more sense to the rest of us if we compare what dbishopbliss has proposed versus the ST35 Rev B schematic. Rev B had a 20 uF cap on the last leg of the power supply, providing the plate supply for the front end of the amp. If you have the schematic handy, it's labelled C17. On the Rev D schematic, it would be C12 (but in Rev D this cap was increased to 120 uF). Oh, from this point on I'm going to reference the Rev D schematic, since that's what dbishopbliss has.

Anyway, I think dbishopbliss needs to tie in one of his 100 uF caps where the B+ goes (terminals 3 and 4 on CON10). The other 100 uF and the 20 uF are hooked up to form the RCRC filter for the front end power supply. He'll need to tie in the 20 uF cap to where the + side of C12 would have gone - which is exactly what he stated he would do.

It's not clear to me that he has stated exactly how he intended to wire up the B+, but I don't think that was his question. It looks like he might be missing a resistor somewhere in his pictorial diagram - I think R33 is there, but I might have missed R32.

Edit...

Hmm, re-reading the posts above, I wonder if he realizes there are really two power supplies here - the 375 volt source off C10 which is used to power the output tubes, and the 320 volt source off C12 which is used to power the 'X7 and 'U7. It would be easy to look at Shannon's schematic and only notice the "320V" label on the left edge of page 13. Don't forget the connection coming off the top of C10, and going around to CON10 on the right side of the page.
User avatar
Ty_Bower
KT88
 
Posts: 1494
Joined: Wed Mar 21, 2007 2:50 pm
Location: Newark, DE

Thanks for pointing that out

Postby dbishopbliss » Sun Dec 16, 2007 5:42 pm

The plan is to bypass the power supply on the board. I missed the connection to the B+. I think I will run a wire from the first 100uF cap to terminals 3 and 4. Another option is to run the red wire from the output transformers directly to the 100uf cap. I'll have to play with it.
dbishopbliss
 
Posts: 13
Joined: Mon Sep 17, 2007 8:37 pm

Postby whitelabrat » Thu Jan 31, 2008 4:12 pm

Perhaps I need a bit of sanity checking, but what I would consider is to have the 33uF at C9 for the recitifer and then have the two poly 100uF's attached to C10 in parallel instead of serial. Then an electrolytic 120uF at C11 and another poly 100uF at C12.

If it were me I would have an electrolytic 120uF feeding into a 80uF poly cap at C10 and then perhaps an 80uF poly at C12.
whitelabrat
 
Posts: 33
Joined: Thu Dec 20, 2007 11:37 am
Location: Maryland, USA

Passive parts

Postby leadtower » Sun Feb 03, 2008 12:58 pm

If this is any help I have two ST 35's DIYTube. One is completely by the BOM. The other i tried oil coupling and filter caps; Rikens in all signal sensitive spots with mills Ra 12's in the PS . I used 2 watt versions of almost everything except the plate loads and there I used 5 watts. The second one sounds very different than the first one. You have to hear it before you spend; but i like it. The only thing left to change is the bias adjusting pots. Micheal Percy has ten turn trimmers for 9$. But I have to warn you; I had an oil coupling cap go leaky in my ST 70 DIYT. I put orange drops back in. Thats a sweet amp!
leadtower
 
Posts: 200
Joined: Tue Mar 30, 2004 8:39 pm

Postby dbishopbliss » Tue Feb 05, 2008 12:59 pm

I'm sooooo close to having it done. Right now I'm stuck on adjusting the negative feedback. When I measure from terminal 3 on J3 (or J4) to ground I do not get any value on my VOM. I have the output secondary disconnected, but get no reading at all.

My circuit has been modified a bit so I've hesitated asking for help yet, but it should be coming soon. I will have a complete write up of circuit changes, power supply changes, front panel express files, and pictures.
dbishopbliss
 
Posts: 13
Joined: Mon Sep 17, 2007 8:37 pm

Postby Shannon Parks » Tue Feb 05, 2008 7:23 pm

dbishopbliss wrote:I'm sooooo close to having it done. Right now I'm stuck on adjusting the negative feedback. When I measure from terminal 3 on J3 (or J4) to ground I do not get any value on my VOM. I have the output secondary disconnected, but get no reading at all.


So it is reading high impedance like an open?
User avatar
Shannon Parks
Site Admin
 
Posts: 3764
Joined: Tue Mar 18, 2003 5:40 pm
Location: Poulsbo, Washington

Postby dbishopbliss » Wed Feb 06, 2008 2:48 pm

separks wrote:So it is reading high impedance like an open?


No reading at all. No difference between having my probes connected to J3 terminal 3 and ground or simply holding them up in the air.

If I measure from J3 terminal 3 to pin 3 (or 8 depending upon the channel) of V1 I get a reading, but it doesn't change when I adjust the pot.
dbishopbliss
 
Posts: 13
Joined: Mon Sep 17, 2007 8:37 pm

Postby Shannon Parks » Thu Feb 07, 2008 6:36 am

dbishopbliss wrote:
separks wrote:So it is reading high impedance like an open?


No reading at all. No difference between having my probes connected to J3 terminal 3 and ground or simply holding them up in the air.

If I measure from J3 terminal 3 to pin 3 (or 8 depending upon the channel) of V1 I get a reading, but it doesn't change when I adjust the pot.


Flip the board over so that you can see the three pins of R30 & R31. Measure directly from the outside pins to each other. You should read 100k. For R31, one side should read 0 ohms to J3-3. The other side should read zero ohms to V1-8 (or J4-3 & V1-3 respectively from R30). Then make sure your cathode resistors are at R5 & R6 (1.3k). V1-3 and V1-8 should read 1.3k to ground. Use ground at J7-2 or J6-2, the audio input ground.
User avatar
Shannon Parks
Site Admin
 
Posts: 3764
Joined: Tue Mar 18, 2003 5:40 pm
Location: Poulsbo, Washington

Postby nyazzip » Sun Feb 10, 2008 2:28 pm

No reading at all. No difference between having my probes connected to J3 terminal 3 and ground or simply holding them up in the air.


try turning the power switch to "on" on your multimeter. i learned this trick a few weeks ago.
Yellow_Light_Colorz_PDT_05
User avatar
nyazzip
KT88
 
Posts: 1073
Joined: Wed Jan 09, 2008 1:24 am

Next

Return to stereo 35

Who is online

Users browsing this forum: No registered users and 39 guests